
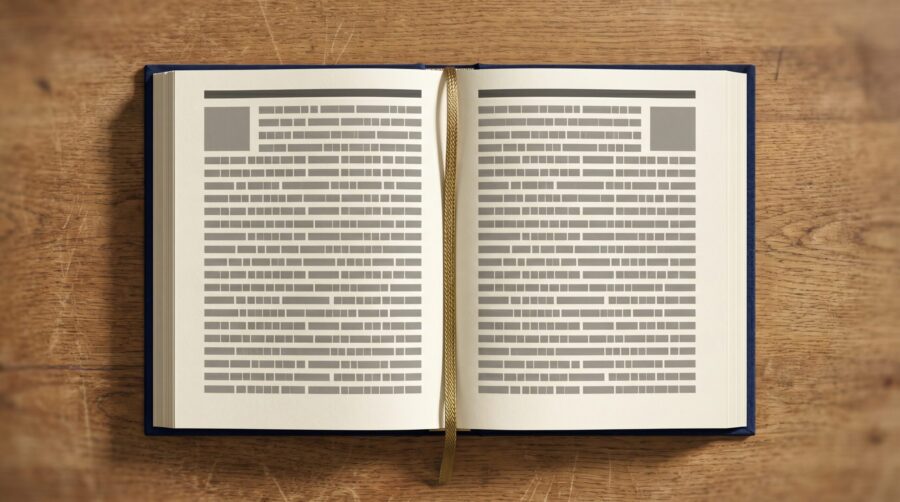
Running headers and page numbers are print-only features. The most common arrangement places the running head (author name, book title, or chapter title) at the top of each page, with the folio (page number) at the outer margin of the same line. Other layouts exist: centred headers with page numbers at the bottom of the page, running footers instead of headers (common in poetry books, where poem titles already occupy the top of the page, and in highly designed books such as coffee table editions), or page numbers at the outer bottom margin with no header at all. Provided everything is consistently arranged on the page and within the safe printing margins, authors do have flexibility. This post uses the conventional top-of-page header with outer-margin folio as its default, since that is what the vast majority of trade books use. To set them up, you need section breaks in Word or master pages in InDesign; tools like Vellum, Atticus, and Kindle Create handle them automatically. Running headers do not apply to reflowable ebooks, though e-reader software does display its own “page” indicators: Kindle shows a Location number or a percentage, and some devices show page numbers mapped from the print edition; these are based on the extent of the ebook on screen and are not the same as fixed print page numbers.
- What Are Running Headers and Folios in a Print Book Interior?
- What Should Your Running Headers Display?
- How Do You Set Up Alternating Headers and Page Numbers in Microsoft Word?
- How Do Vellum, Atticus, and Kindle Create Handle Running Headers?
- Do Ebooks Need Running Headers or Page Numbers?
- Frequently Asked Questions
What Are Running Headers and Folios in a Print Book Interior?
A running header (also called a running head) is the line of text that repeats at the top of each page in a printed book. A folio is the typographic term for a page number. Together, they help readers navigate longer works by showing where they are in the book at a glance.
In the most common arrangement, running headers alternate between left-hand (verso) pages and right-hand (recto) pages. The left page typically carries one identifier (such as the author name) and the right page carries another (such as the book title or chapter title). Folios sit at the outer margin of each running header: the top-left corner on verso pages and the top-right corner on recto pages. This is the layout we will focus on here, but as noted above, other placements are perfectly acceptable as long as they are consistent throughout the book and stay within the required margins.
There are specific pages where running headers should not appear. The title page, copyright page, and dedication page are conventionally left clean, as are intentionally blank pages (a blank page that still carries a running head and folio is another sure sign of an amateur layout). The first page of each chapter also suppresses the running header; instead, the page number moves to the bottom centre of the page. This repositioned page number is called a drop folio. Full-page images and tables (especially those turned landscape or sideways) also typically omit running heads and folios, though this is a design choice rather than a strict rule. In our experience formatting thousands of print interiors at Newgen, the most common mistake we see is authors who add headers to every page without exception, including chapter openers, blank pages, and front matter; this immediately signals an unprofessional layout to experienced readers.
Front matter pages (everything before the main text begins) are typically numbered with lowercase Roman numerals (i, ii, iii), while the body text starts at Arabic page 1 on the first page of Chapter 1 or the first main section of body text (for example, a lengthy Introduction that functions as the opening of the book rather than as front matter; see our guide to front and back matter for where to draw that line). Both Amazon KDP and IngramSpark accept manuscripts that follow this convention. IngramSpark’s Print Book File Guidelines recommend a minimum 0.5-inch (13 mm) margin from the final trim on all sides for all headers, footers, page numbers, and body text.
What Should Your Running Headers Display?
The content of your running headers depends on whether your book is fiction or nonfiction, and on how it is structured. There is no single rule, but two patterns cover the vast majority of published books.
Fiction (novels, short story collections, memoirs): The standard convention places the author name on the left-hand page and the book title on the right-hand page. This pattern works well because fiction readers rarely need to locate a specific chapter; the headers serve primarily as a visual reference confirming which book they are reading.
Nonfiction (guides, textbooks, reference works): The more common approach places the book title on the left-hand page and the current chapter title on the right-hand page. Nonfiction can also use the author name/book title pattern (the same as fiction), but book title/chapter title is usually more helpful because nonfiction readers frequently flip between chapters and sections; displaying the chapter title on the recto page helps them orient quickly. For highly structured works with parts and chapters, you might place the part title on the left and the chapter title on the right. Dictionaries, encyclopaedias, and other reference works with frequent text divisions often use a different convention: the first entry on the verso page and the last entry on the recto page, so readers can quickly locate an entry by fanning through the book.
The general principle is that the larger unit goes on the left (verso) and the smaller unit goes on the right (recto): an author may have multiple books, and a book will have multiple chapters. What matters most is consistency: once you choose a pattern, apply it uniformly throughout the book. The font for running headers should be visually distinct from the body text; a common approach uses a sans-serif font (such as Helvetica or Arial) at a smaller point size (typically 8 to 10 points) when the body text is set in a serif font at 11 or 12 points.
How Do You Set Up Alternating Headers and Page Numbers in Microsoft Word?
Word uses section breaks to control headers and footers independently for different parts of your book. The key steps are: create a new section for each chapter, enable different odd and even pages, and unlink each section’s headers from the previous one. We recommend setting up running headers and page numbers only once your text and main layout are as close to final as possible; the process is quite laborious in Word, and extensive content changes afterwards can easily disrupt the header and page-number setup you have built.
Here is the process step by step:
- Insert section breaks before each chapter. Place your cursor at the end of the text before a new chapter begins. Go to Layout > Breaks > Section Breaks > Next Page. This starts the chapter on a new page and gives you independent header/footer control for that section. Do not use a regular page break; page breaks do not create new sections and will not allow you to change headers.
- Enable Different Odd & Even Pages. Double-click inside any header area to open the Header & Footer Design tab. Check the box labelled Different Odd & Even Pages. According to Microsoft’s documentation, this lets you create separate left-page and right-page headers.
- Unlink from the previous section. In the Navigation group of the Design tab, click Link to Previous to deactivate it. You must do this separately for both the odd-page header and the even-page header. When Link to Previous is active, changes in one section propagate to every section; turning it off gives you independent control.
- Type the header content. On even (left) pages, type the author name; on odd (right) pages, type the book title or chapter title. Insert a page number at the outer edge of each header using Insert > Page Number > Top of Page.
- Suppress headers on chapter openers. With the cursor in the first page of a chapter section, check Different First Page in the Design tab. Leave the first-page header blank and add a centred drop folio in the first-page footer instead.
- Remove headers from front matter. The title page, copyright page, and any other preliminary pages should have their own section with headers deleted entirely. Set your page margins to meet the minimum 0.5-inch requirement before finalising.
How Does InDesign Handle Running Headers Differently?
Adobe InDesign uses master pages and text variables instead of section breaks. You create a master page spread with placeholder text variables for Running Header (Paragraph Style) and a page-number marker. Apply the master to all body pages, then override it on chapter-opening pages to suppress the header and reposition the folio. InDesign’s text-variable approach automatically pulls the chapter title from wherever it appears in the text, which eliminates the manual updating required in Word.
How Do Vellum, Atticus, and Kindle Create Handle Running Headers?
Self-publishing formatting tools automate most of the running-header setup, removing the need for manual section breaks or master pages. Here is how the three most popular tools handle it.
Vellum (Mac only): According to Vellum’s official documentation, headers and footers apply only to the print edition. Vellum automatically suppresses headers on the first page of each chapter and on single-page elements such as the dedication or acknowledgements. You can choose different content for left and right pages and select from several header and footer styles. Vellum generates a print-ready PDF that meets KDP and IngramSpark specifications.
Atticus (Mac, Windows, Linux, Chromebook): Atticus provides options for page-number placement (bottom centre, bottom outside, or top outside) and automatically displays the book title on left pages and the chapter title on right pages. Front matter uses Roman numerals, the first page of the body starts as page 1 on a right-hand page, and the header is suppressed on the first page of any chapter when page numbers are placed in the header. These defaults match professional conventions without requiring manual configuration.
Kindle Create (free, Windows and Mac): Amazon’s own tool automatically calculates margins, adds page numbers to the table of contents page and footers, and starts the first chapter on a right-facing page. By default, Kindle Create places the author name in the left-page header and the book title in the right-page header, with page numbers in the footer. These positions can be customised in Print Settings. Kindle Create produces files ready for KDP upload but not for IngramSpark or other distributors.
Do Ebooks Need Running Headers or Page Numbers?
No. Reflowable ebooks should not contain running headers or fixed page numbers. KDP’s official documentation states that ebooks are reflowable, so page numbers and page count do not apply, and authors should not add headers or footers to the manuscript file intended for ebook conversion.
Draft2Digital’s layout documentation confirms the same principle: ebooks do not have page headers, and page numbers do not appear in the ebook edition. When you upload a manuscript to Draft2Digital’s automated formatting tool, it strips any headers and footers during ebook conversion but inserts headers, footers, and page numbers for the print edition based on the book’s metadata.
The reason is structural. A reflowable ebook adjusts its text layout to fit whatever screen size and font preference the reader chooses. A page that shows 250 words on a phone might show 400 words on a tablet; fixed page numbers would be meaningless. E-reader software provides its own location indicators (such as Kindle’s “Location” number or percentage) instead. If you are producing both a print edition and an ebook from the same manuscript, keep headers and footers out of the ebook source file entirely and add them only to the print workflow, whether manually in Word or automatically through your front and back matter setup.
Frequently Asked Questions
Should the first page of a chapter have a running header?
No. Standard book-design practice suppresses the running header on every chapter-opening page. Instead, the page number appears as a centred drop folio at the bottom of the page. Both Vellum and Atticus handle this suppression automatically; in Word, you enable it by checking Different First Page in the Header & Footer Design tab for each chapter section.
What is the difference between a page break and a section break for headers?
A page break simply starts text on the next page but keeps the same header and footer settings. A section break (Next Page) starts a new page and creates an independent section where you can set different headers, footers, and page-numbering formats. You must use section breaks, not page breaks, if you want to change or suppress running headers at chapter boundaries.
Can I use different running headers for each chapter in Word?
Yes. Insert a section break (Next Page) before each chapter, then deactivate Link to Previous in the Header & Footer Design tab. This unlinks the new section’s header from the previous chapter, allowing you to type a different chapter title in each section’s recto header. Remember to unlink both the odd-page and even-page headers separately.
Do running headers affect my ebook formatting?
Running headers are a print-only feature. If you include them in a file intended for ebook conversion, they may appear as unwanted text at the top of each page or cause conversion errors. Remove all running headers and footers from your ebook manuscript; e-readers provide their own navigation and location indicators.
Where should page numbers be placed in a self-published print book?
The most common placement is at the outer edge of the running header: top-left on even (verso) pages and top-right on odd (recto) pages. Some designs place page numbers at the bottom centre of every page instead. On chapter-opening pages, the page number typically appears as a centred drop folio at the bottom regardless of where it sits on regular pages. Both KDP and IngramSpark accept either placement as long as all text stays within the required 0.5-inch margin from the trim edge.
