
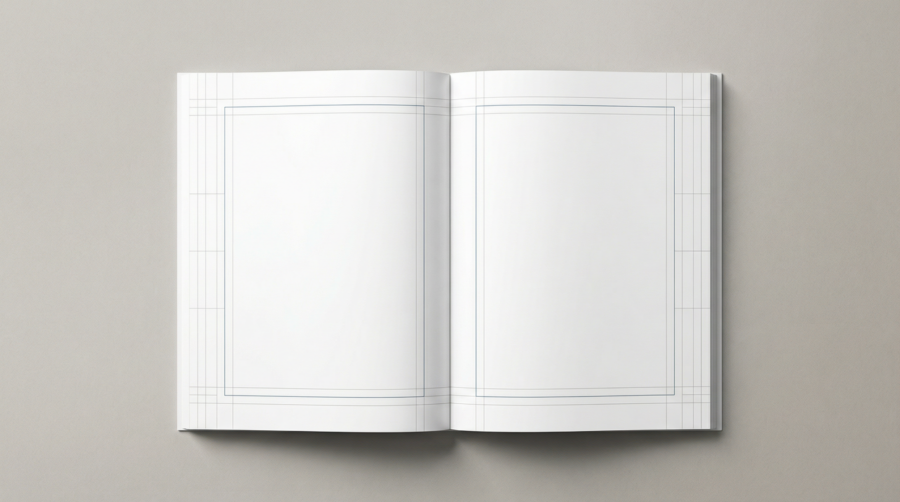
Page margins for print on demand are published as minimums, not as recommended settings. Amazon KDP scales the inside margin from 0.375″ to 0.875″ as page count rises, and asks at least 0.25″ on the other three edges of a book without bleed. IngramSpark recommends 0.5″ all round. Set yours before you start formatting.
- What are the four margins, and what is each one measured to?
- What do KDP and IngramSpark ask for?
- Why your margins are usually wider than the minimum
- Mirror margins: why your proof looks lopsided, and how to set them in Word
- How does bleed change your page size?
- What should you set, and what should you check?
- Frequently Asked Questions
What Are the Four Margins, and What Is Each One Measured To?
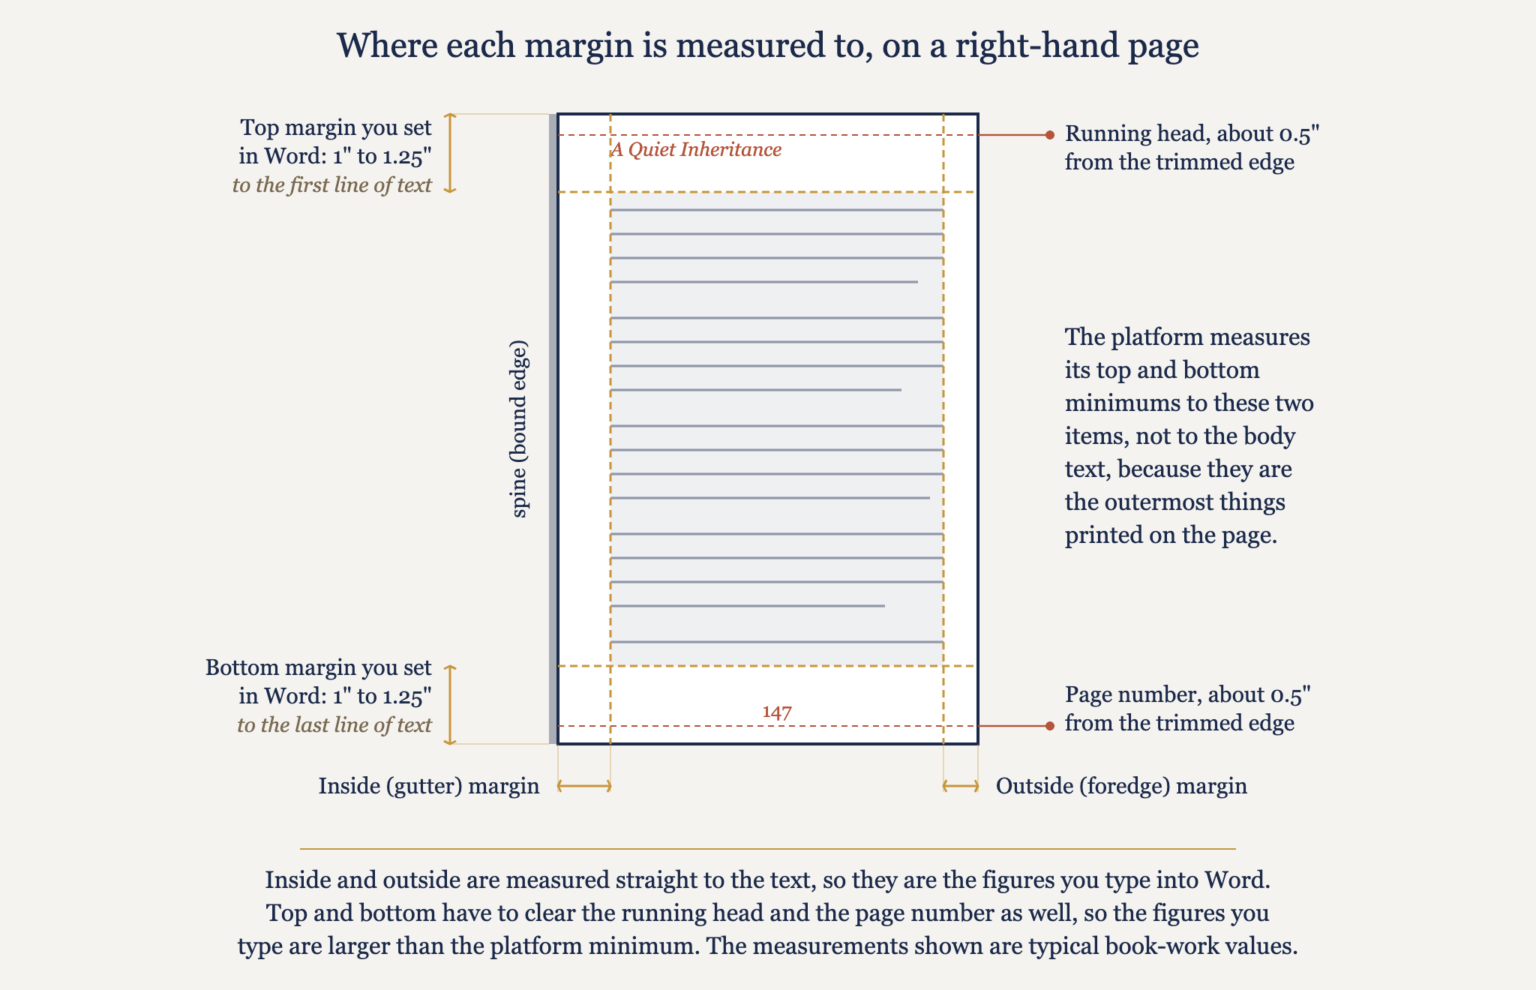
Every page of every book has four margins, and so does every document you have ever typed. The inside margin, also called the gutter, runs along the bound edge. Opposite it sits the outside margin, or foredge, on the edge you hold. Top and bottom margins complete the frame. The gutter is the one that does extra work, because the binding takes up space the reader cannot flatten out.
On a thick book the paper curves down into the spine, so text set close to the gutter slides into the fold. That is why the inside margin is usually the widest of the four. It is a convention rather than a requirement. Academic and scholarly books are often set with a generous outside margin instead, so that readers have somewhere to write. Those books look entirely correct.
The four figures are not all measured to the same thing. The inside and outside figures you type into Word are the distance from the trimmed edge to the text itself. Top and bottom behave differently. Two more printed items sit above and below the block of body text, which typesetters call the text block. One is the running head, the book or chapter title repeated at the top of each page. The other is the page number, which a printer calls the folio. A platform’s top and bottom minimums apply to the outermost printed thing on the page, so they land on those two items rather than on the first line of body text.
The top and bottom figures you set therefore end up larger than the published minimum, with the running head and the folio living in the space between. In ordinary book work the running head sits about 0.5″ from the trimmed edge, and the text block starts 1″ to 1.25″ down. The foot mirrors it, with the folio about 0.5″ up from the bottom edge. Where those two items sit is decided when you set up the header and footer, not by the margin figures. Our guide to setting up running headers and page numbers covers that part.
What Do KDP and IngramSpark Ask For?
Amazon KDP and IngramSpark both publish margin figures, and both publish them as minimums rather than as settings to copy. Clearing the minimum is what gets a file through the platform’s automatic check at upload. Whether the page reads well is a separate question, and the next section takes it up.
Amazon KDP
KDP varies the inside margin by page count, because the thicker a book gets, the more of the inner edge disappears into the spine. Its Set Trim Size, Bleed, and Margins page gives the minimum gutter for each band:
- 24 to 150 pages: 0.375″ (9.6 mm)
- 151 to 300 pages: 0.5″ (12.7 mm)
- 301 to 500 pages: 0.625″ (15.9 mm)
- 501 to 700 pages: 0.75″ (19.1 mm)
- 701 to 828 pages: 0.875″ (22.3 mm)
KDP treats the outside, top and bottom margins as one group. Each must be at least 0.25″ on a book without bleed, meaning one where nothing is printed right up to the edge of the page. Where something does run to the edge, the outside, top and bottom rise to at least 0.375″. The three do not have to match each other; each simply has to clear the minimum. KDP’s own worked example sets the top and bottom to 1″ and the outside to 0.375″. Those proportions are much nearer a typeset page than the bare minimum would be. The same gutter table covers hardcovers as well as paperbacks, so a title in both bindings can share one interior setup.
A tiered table has one consequence worth planning for. Near a band boundary, adding or cutting a few pages moves the book into the next tier and raises the minimum gutter with it. A 299-page manuscript and a 301-page manuscript sit either side of that line. This is the one part of your margins you cannot settle entirely up front. Set them before you format, then check the gutter once more when the book has its final length. Change it only if the page count has crossed a band.
IngramSpark
IngramSpark publishes one figure for all four edges. Its File Creation Guide recommends a minimum of 0.5″ on every side of the text block. Headers, footers, page numbers, body text and any image that does not bleed all have to stay inside it, and the figure does not change with page count.
Every print-on-demand printer works to a tolerance, and margins are how a file absorbs it. IngramSpark publishes its figure in the same guide: a 1/16″ (2 mm) variance on every book it prints. The number matters less than the habit it should produce, which is to keep anything you care about well clear of the trimmed edge.
KDP and IngramSpark side by side
The table below sets out what Amazon KDP and IngramSpark each ask for, edge by edge, so you can check one file against both sets of figures:
| Margin | Amazon KDP (minimum) | IngramSpark (recommended minimum) |
|---|---|---|
| Inside (gutter) | 0.375″ to 0.875″, by page count | 0.5″, the same at any page count |
| Outside (foredge) | 0.25″, or 0.375″ with bleed | 0.5″ |
| Top | 0.25″, or 0.375″ with bleed | 0.5″ |
| Bottom | 0.25″, or 0.375″ with bleed | 0.5″ |
| Bleed, where used | 0.125″ on three edges | 0.125″ on three edges |
If you are publishing to both, take the larger figure on each row. That gives you one interior that meets both, as long as you also apply the bleed increases explained below where your book needs bleed at all.
Why Your Margins Are Usually Wider Than the Minimum
A platform’s published minimum answers one question only: how close to the edge may something sit before the printer refuses the file? Page margins for print on demand set at the bare minimum will normally clear that automatic check. Clearing it is not the same as producing a page that is comfortable to hold and read. Authors have several ordinary reasons to go well past the minimum.
Readability is the first reason. A wide foredge gives the thumb somewhere to rest that is not on the text. A generous gutter keeps the inner column clear of the curve on a thick book. Thickness is the second, which the trade calls bulk. A short manuscript set tight makes a thin book, sometimes with a spine too narrow to carry its own title. Widening the margins is one of the standard ways of giving it more substance. The third is annotation: study editions, workbooks and academic titles are often set with a deliberately wide outside margin so that readers can write in it.
There is a mechanical reason too, and it is one we build into our own files. We usually add a small safety net of 0.05″ to 0.1″ on each edge, on top of the published minimum. Some typefaces are drawn so that individual characters reach a little outside the text block. An italic f, whose ascender and descender both swing past the body of the letter, is the one to picture. A single stray character crossing a boundary can fail an entire file, and the safety net costs nothing.
Mirror Margins: Why Your Proof Looks Lopsided, and How to Set Them in Word
Why the wide margin moves from page to page
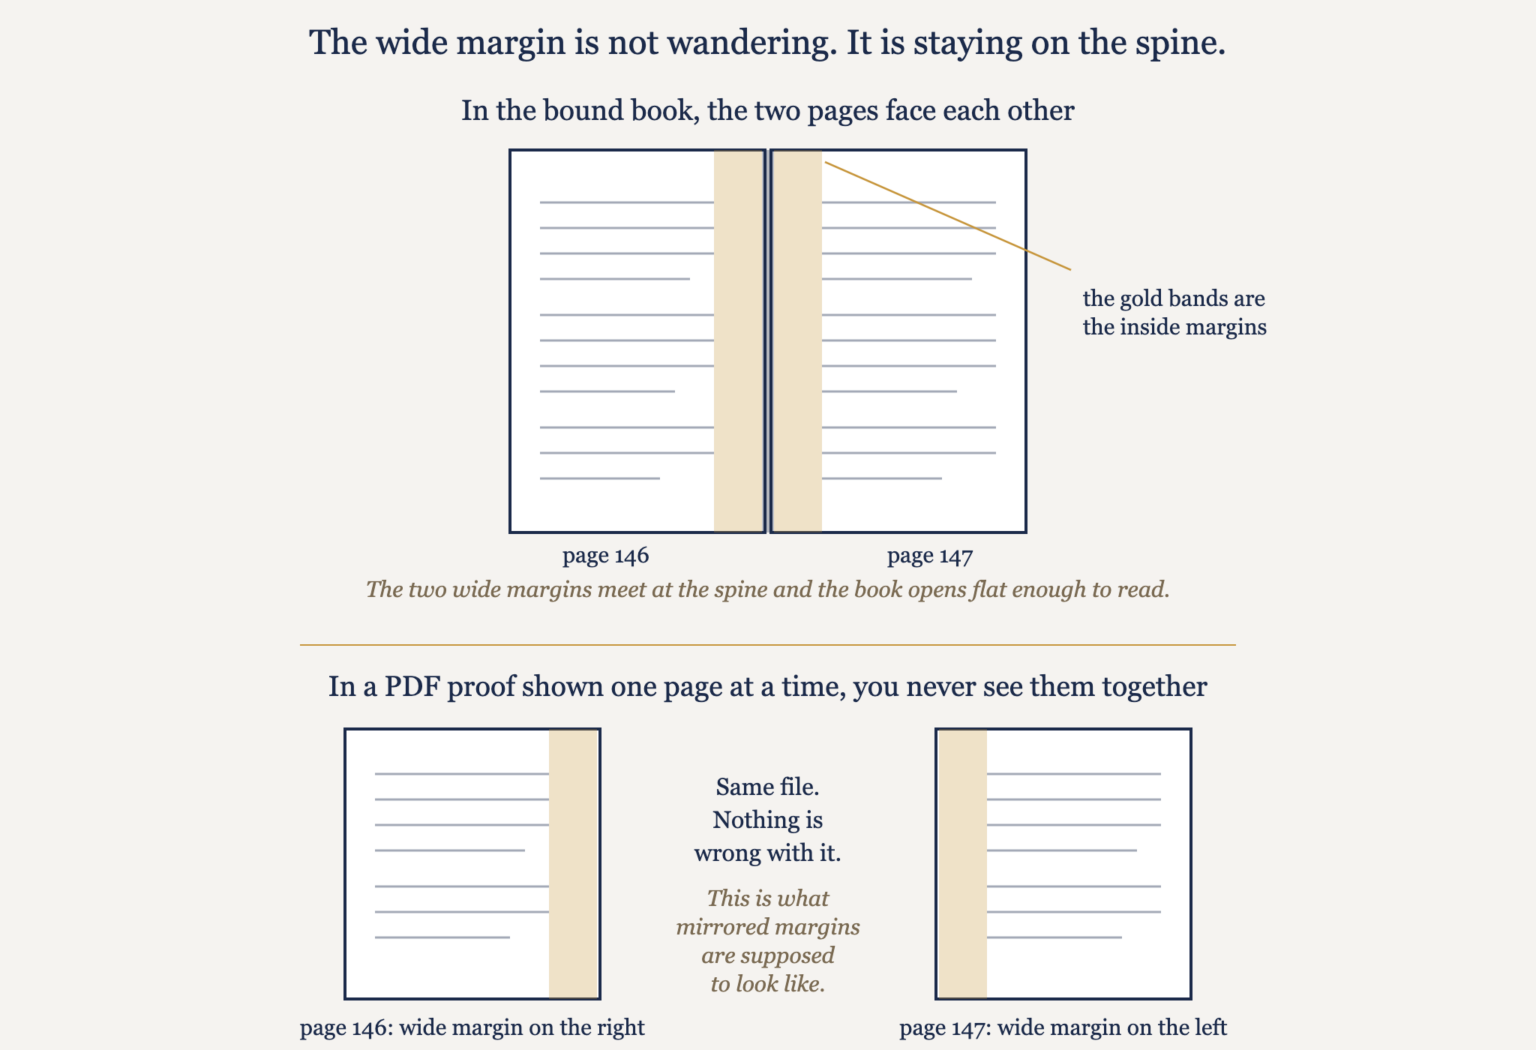
Authors opening their first printed proof, the sample copy you order before publishing, often ask us the same question. Why do the margins look inconsistent, with the wide margin on the right of one page and the left of the next? Nothing is wrong with the file. A PDF reader opens at its usual single-page view and shows one page at a time. That is the one view in which a correctly set book looks wrong.
The gutter belongs to the spine, and the spine is on the right of a left-hand page and on the left of a right-hand page. The wide margin therefore has to change sides from page to page. A file where it stayed on the same side would be the one with a problem. Bind the same two pages and they face each other, the two wide margins meet in the middle, and the spread reads exactly as it should.
How to set mirror margins in Word
Mirror margins are Word’s setting for facing pages. Microsoft puts it plainly: with mirror margins, “the margins of the left page are a mirror image of those on the right page.” Word does not apply this by default, so a print file needs it switched on deliberately. First make sure Word’s page size matches the trim size you have chosen, under Layout > Size > More Paper Sizes. Word works out margins against the page size, so the order matters. If your interior carries bleed, that page size is larger than the trim size, and the next section gives the arithmetic.
- Go to Layout (or Page Layout in older versions) > Margins > Custom Margins.
- Under Multiple pages, choose Mirror margins. The Left and Right boxes become Inside and Outside.
- Put your inside-margin figure in the Inside box, and your foredge figure in Outside.
- Set Top and Bottom to leave room for the running head and page number as well as clearing the minimum.
- Apply the change to the whole document rather than to the current Word section, then click OK. Applied to one section, the setting leaves your front matter, meaning the title page, copyright page and contents, sitting on the old values.
Word uses the word gutter more narrowly than this article does, and the difference catches people out. Alongside the Inside box there is a separate Gutter box, which Microsoft documents as adding extra space on top of the margin you have already set. Fill in both and the space at the spine is the two added together. Put the whole figure in the Inside box and leave Gutter at zero, or split it between them; what has to clear the minimum is the total. A note on KDP’s own margins page tells you to enter the same value for the inside margin and the gutter, which in Word would double the space at the spine; the figure the printer checks is the total, so use one box. These paths apply to Word for Microsoft 365, 2024, 2021, 2019 and 2016, on Windows and Mac alike.
The two figures that place the running head and the page number sit somewhere else again. In Word for Mac, double-click into the header area and a Header & Footer tab appears in the ribbon. It carries Header from Top and Footer from Bottom boxes. Those two are measured from the trimmed edge to the furniture itself, so set them to about 0.5″ and leave Top and Bottom holding the text block at 1″. The tab stays hidden until you double-click into the header, which is why the setting is easy to miss.
To check the result, switch to View > Multiple Pages and scroll through. The wide margins should meet in the center of each spread. If both halves of a spread look identical, mirror margins did not take. KDP also publishes free Word templates for each trim size, already set up this way, which removes the question for anyone starting from scratch.
How Does Bleed Change Your Page Size?
Bleed is what you add when an image, a background color or a printed line is meant to reach right to the edge of the finished page. Pages are trimmed after printing and no trimmer is perfect, so artwork stopping exactly at the edge can leave a hairline of white paper showing. Extending it past the cut solves that. Most text-only interiors never need bleed at all.
What bleed changes is not the size of the finished book. Your 6″ × 9″ paperback is still 6″ × 9″ when it arrives. What grows is the page you build. KDP’s instruction on the same margins page is to increase the page size beyond where it will be trimmed. A 6″ × 9″ book therefore becomes a 6.125″ × 9.25″ page, printed on larger paper and cut back down.
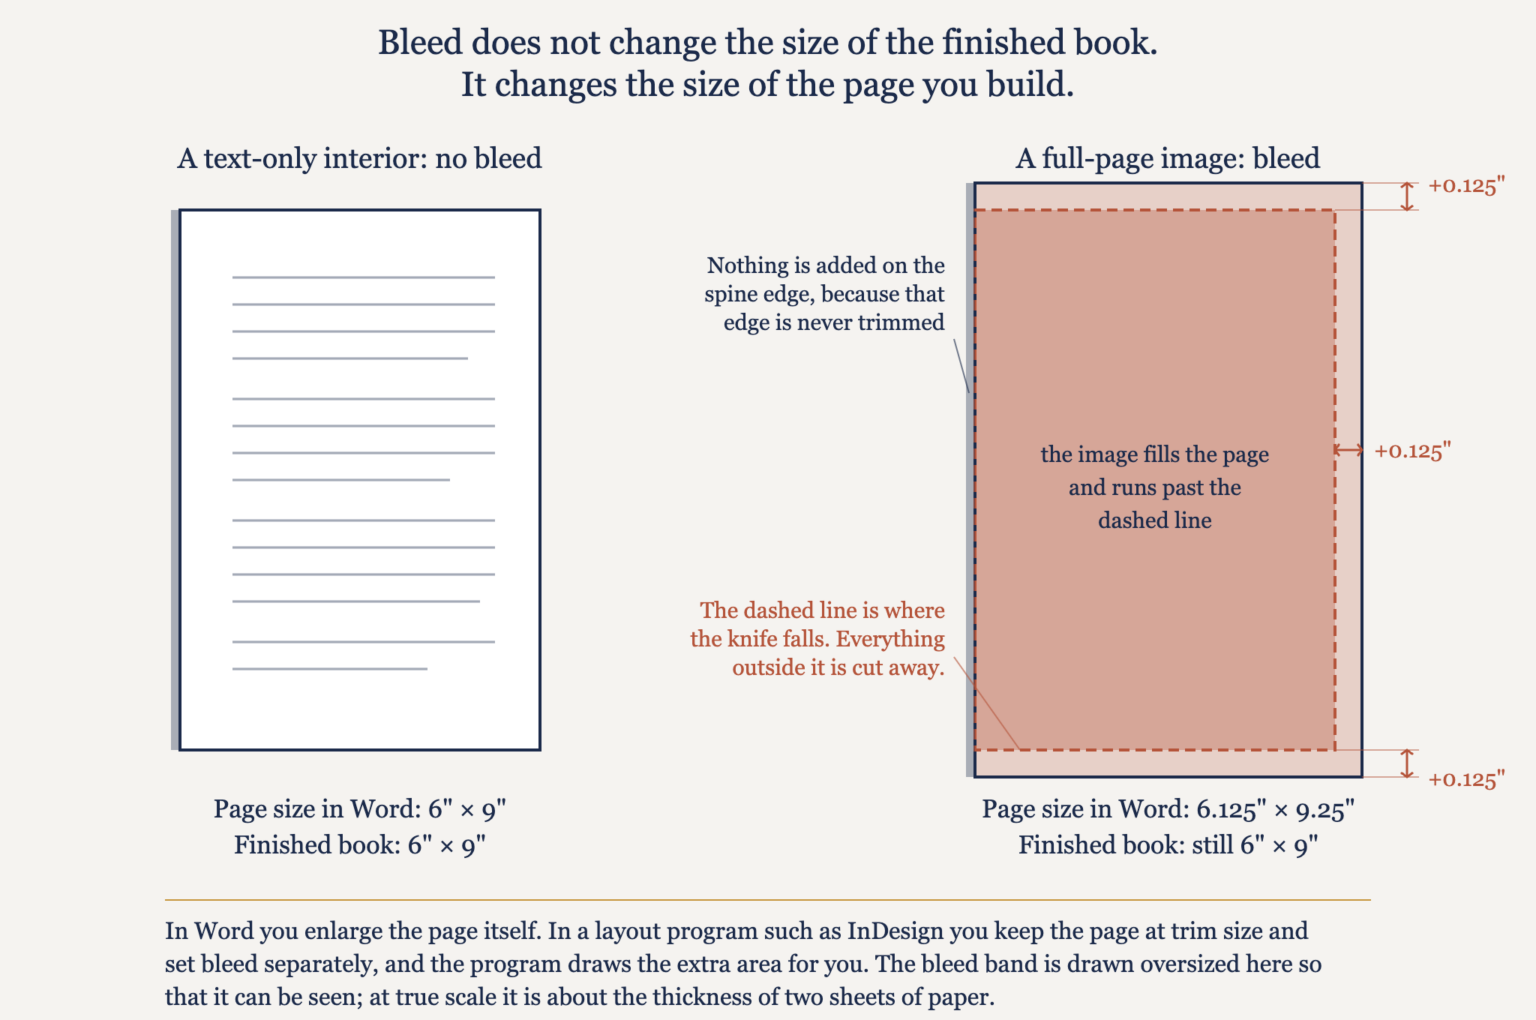
Notice that the extra 0.125″ goes on three edges and not four. The bind edge is not trimmed to size the way the other three are, so nothing is added there. KDP’s margins page and IngramSpark’s File Creation Guide agree on this: bleed on the bind edge throws the page out of position. So the height grows by twice the bleed and the width by only once. On KDP the outside, top and bottom minimums also rise to 0.375″ once a file carries bleed.
How you set this up depends on your software, and it is one of the few places where the tool genuinely changes the instructions. A layout program such as InDesign treats bleed as a separate file setting. You build the page at trim size, and the program draws the extra area outside it for you. Word has no equivalent setting, so the extra area has to come from the page size itself. That is why the figures above describe a bigger page rather than a wider margin. This matters most on image-led books, and it is worth reading why full-page artwork pushes authors toward a layout program. One more point on tooling: KDP supports bleed in fixed-format files such as a print-ready PDF, so a Word interior needs exporting to PDF before bleed takes effect.
What Should You Set, and What Should You Check?
For a standard novel-length paperback of 200 to 300 pages in a 6″ × 9″ trim size, the settings below clear both platforms. They also produce a page that looks like a book rather than a report. Treat them as a starting point and adjust once you know your final page count:
- Inside (gutter): 0.75″, which clears both minimums at this length and survives crossing the 300-page line
- Outside (foredge): 0.5″
- Top: 1″, with the running head about 0.5″ from the edge, inside it
- Bottom: 1″, with the page number the same distance up from the bottom edge
Those figures already carry the safety net described above. A much longer book needs the gutter checked against the band table again. At 501 to 700 pages 0.75″ is exactly the minimum, and beyond that it falls below.
Margin errors are among the top five causes of rejection we see in the files authors send us to fix. That makes them worth checking twice, and three checks catch most of it. First, confirm the page size is your trim size and not Word’s default, which is 8.5″ × 11″ in the US and A4 in most other places. The margin figures look perfectly correct while being measured against the wrong page. Second, confirm mirror margins are on, using the two-page view. Third, confirm the running head and page number sit inside the top and bottom margins. That is the one fault the numbers in the dialog box will never show you. Where a file has already been refused, our guide to PDF interiors rejected by KDP works through the other common causes.
Page margins are among the first things to settle in a print file, and they are far easier to set at the start than to change later. Moving a margin reflows every page, which shifts your page count, and a new page count can push you into a different gutter band. Ten minutes in the margin dialog, before you format a single chapter, is the cheapest ten minutes in the whole process.
Frequently Asked Questions
Do KDP and IngramSpark use the same page margins for print on demand?
No. KDP scales the inside margin by page count, from 0.375″ up to 0.875″, and asks at least 0.25″ on the outside, top and bottom of a book without bleed. IngramSpark recommends 0.5″ on all four edges at any page count. If you publish to both, take the larger figure on each edge, and one interior will then meet both sets of figures.
What gutter margin do I need for a 400-page book?
On KDP a 400-page book sits in the 301 to 500 band, so the minimum gutter is 0.625″. IngramSpark’s recommended 0.5″ does not change with page count. Setting 0.75″ clears both with room to spare, and at that thickness it also reads better, because more of the inner edge disappears into the spine.
Should I fill in Word’s Gutter box as well as the Inside margin?
No, not with the same figure in each. Microsoft documents the Gutter box as adding extra space on top of the margin you have set. Entering your gutter value in both boxes therefore doubles the space at the spine. Put the whole figure in the Inside box and leave Gutter at zero, or split it between the two. The total is what has to clear the platform minimum.
Why do my margins move from page to page in the PDF proof?
Because they are mirrored, which is correct for a bound book. The wide inside margin belongs to the spine, and the spine swaps sides between left-hand and right-hand pages. A PDF reader showing one page at a time is the only view in which that looks wrong. Switch your reader to two-page or facing-page view and the wide margins will meet in the middle.
Will Word warn me if my margins are too small?
Not in any useful way. Word may show a generic notice about margins falling outside the printable area, which refers to your desktop printer. It has no knowledge of KDP or IngramSpark rules and will not flag a gutter that is too narrow for your page count. The real check is the platform’s own automatic check when you upload, so verify the values yourself first.
Do I need mirror margins for an ebook?
Not for a normal reflowable ebook. It reflows to whatever screen it lands on and has no fixed pages and no binding, so the setting has nothing to mirror. Set mirror margins in the print file only; a reflowable conversion ignores them. Fixed-layout ebooks, used for picture books and comics, do keep fixed pages, and there the page design carries over from the print file.
